Categories
Ceramic tiles Steam in the oven

How to add steam to your oven

Every bread connoisseur values the crust of the bread as much as the crumb development. A hot and steamy environment for your bread is crucial during the first 10-15 minutes of baking. The easiest way to keep the oven steadily hot during baking is to use a pizza stone. A good pizza stone can be expensive. Bakers came up with an excellent and inexpensive solution. I am talking about non-glazed ceramic tiles from your local building store. This has been my choice for many years.


Some bakers prefer to tile two oven shelves rather than one. In this case, you bake the pizza on the bottom layer of the tiles. The top layer has an additional thermal effect on the top layer of pizza. Thus, the top and the bottom of the pizza are crisp. This can be useful for baking thicker pizza varieties, like deep-dish pizza. Keep in mind that the oven will take even longer to warm up. Experiment and decide for yourself, which is more convenient.


I place the tiles on the oven shelf right before heating. Many years ago, I “hardened” my tiles by gradually heating them in several steps. This allowed the tiles to adapt to the temperature. The tiles should always cool down gradually. Ceramics dislike sudden changes in temperature. They give away accumulated heat slowly.


Home bakers also need an additional source of steam during the first 10-15 minutes of baking. It is especially important for bread made with white flour. Most professional ovens have a built-in steam option. Home bakers are less fortunate that way and have to improvise. There are two basic ways to make sure your bread is surrounded with enough steam during the first stage of baking. 


The first option is to use a heavy metal dish or a skillet on the bottom shelf of your oven. You preheat the oven with this dish or a skillet inside. I use two quarter-sheet aluminum pans sandwiched together.


The upper pan gets warped because of the temperature shock. I saw YouTube videos where bakers threw ice directly into the bottom of the oven. I would not advise you to do that, even if your heating element is covered with something. Two aluminum pans are a very inexpensive solution.


Plus, if you bake pizza, you should have a pizza stone or a set of ceramic tiles for your oven.


I slide the bread from the pizza peel onto the ceramic tiles and put 5 medium pieces of ice into my sandwiched aluminum pans. This creates enough steam for a good crust and oven spring of my bread. Temperature settings and timing are in my recipe posts.


The dough is the same. The little loaf on the left was baked without extra steam in the oven. The loaf on the right had ice cubes on the aluminum pan during the first 10 minutes of baking.
Steam vs No Steam. The dough is the same.

Another option would be to use a large Dutch oven. Sometimes I use that option too. In fact, this is my new favorite way of baking sourdough bread. It does not require any ice or aluminum trays on the bottom shelf of the oven.


I preheat my Dutch oven to 482°F (250°C). Meanwhile, I prepare two large heat-resistant coasters on the kitchen counter. One coaster is for the Dutch oven and the other is for the lid. When I hear the signal from my oven announcing the end of the preheating, I bring the Dutch oven to the counter. 


I take the bread out of the basket and put it on a piece of parchment paper, slightly wider than your bread. It should be long enough for you to hold it by the ends and safely transfer your bread inside the hot Dutch oven.


Then I put the lid back on and place the Dutch oven back inside the oven for 25 minutes.


After that, I take the lid off and continue baking without the lid, but still inside the Dutch oven for 10 more minutes.


To finish baking, I take the Dutch oven out and transfer the bread into a baking pan. That way, I have a better chance of not burning the bottom of the bread.


I lower the temperature of the oven to 425°F (218°C) and bake for 10-15 minutes more. The timing depends on the size of the bread. Check on your bread often and adjust the timing if necessary.


A few comments about different ovens and steam.


My new oven does not like the tile-steam combo that much. I have a convection oven and the oven fan started making some noise at the beginning of the preheating cycle.


I used to have an oven without convection before, and a lot of steam was fine for it. Just make sure you do not drop your ice cubes on the bottom heating element or onto the bottom floor of the oven.


Taking all this into consideration, baking bread in a Dutch oven seems to be safer for your oven.


Your oven could be more steam-tolerant. Bread baking certainly decreases the life expectancy of domestic ovens. I am aware of that and I still choose to bake my bread. Decide for yourself.


Ceramic tiles are wonderful for pizza and a variety of flatbreads (no ice cubes required). A serious home baker has to use both methods. 


Choose the option that works best for you. Happy baking!
 

Categories
Fermented beverage Kvass Sourdough discard

Fermented Bread Beverage — Kvass. Part 2

In the evening, I strained the mixture through a colander into a large mixing bowl. I added 3 tablespoons of sugar and mixed everything together. Sugar is necessary to boost the second fermentation. This is the only way to get that fizzy fermented drink that I love since I was a kid.

Then I poured the kvass into bottles through a fine strainer and a funnel. I used large plastic seltzer bottles. They have airtight lids.
 
I put the leftover bread from the large sieve into a small jar and put the jar in the refrigerator. This is my new starter for the next batch of kvass. I will not have to add sourdough for the new batch.
 
For the second fermentation, you may put raisins or mint leaves into your bottles with kvass. These additions are very popular for kvass. They boost the fermentation process and give new flavors. 

Then kvass ferments in bottles at room temperature for a few days. After that, I put it in the refrigerator.
 
It is a very fizzy drink at this point. Open the bottle slowly!
 
I do not think that kvass is a warm-weather beverage. It is a fermented beverage that is like Kombucha. You can buy Kombucha all year round in a supermarket. Why not treat kvass the same way? I make kvass less frequently in winter, but I still make it.
 
I remember how my grandmother made her kvass. It fermented in a large enameled bucket in her summer kitchen. I would strain some kvass at the end of its first fermentation, strain it into a mug and drink room temperature. Most people prefer kvass cold. Either way, it is a very nice fermented beverage.

The taste is fragrant and bready. I love kvass with aromatic herbs like lemon balm and mint, but this time I made it simple. For color, you could add molasses or date syrup. This is just a basic recipe. Make it to your own liking.


Categories
Fermented beverage Kvass Sourdough discard

Fermented Bread Beverage — Kvass. Part 1

When you first work with sourdough, you might wonder how to use all that surplus sourdough you have. I was concerned about that too. I do not throw away any sourdough discard. So, I want to share my ways of dealing with it.
 
I use it to make a traditional Russian fermented bread beverage — Kvass. Most people use leftover bread for it. I thought that making this special sourdough discard bread would be a much better option for me. I have some sourdough discard after every feeding of my sourdough culture.
 
The simplest way to make this bread is to collect all the sourdough discard over the course of a few weeks. I use a large jar for it and keep it in the refrigerator.
 
When I have enough sourdough discard to make a loaf of bread, I take it out of the jar into a large bowl. I add some flour to it and make a dough. I knead the dough by hand. It is very easy to do. There are only two ingredients — sourdough and flour. The dough should not be very sticky. There are no particular requirements for the crust and crumb of this bread either.
 
I shape it into a loaf and put it in a floured basket. It stays in the basket for a few hours and rises a bit. The dough is rather heavy and the sourdough itself is not in a very active stage of its development. But it serves its purpose well.
 
After a few hours of fermentation, preheat the oven to 450 ° F (230 ° C) with ceramic tiles in it. Then I put this bread on parchment paper and slide it onto ceramic tiles. Most of the time I bake this bread before or after baking my regular bread. That way I do not use the oven for this bread only.
 

After baking, I let the bread cool down, cut it into pieces, and dried it in the residual heat of the stove. I had enough dried bread for three batches of kvass. Your bread does not have to be as large as mine. You may bake your bread for one batch of kvass to try it.
 
I put some dried bread into a large pot with boiling water. I let it simmer for a few minutes and turned the heat off. I let it brew and cool completely in this pot. Then I transferred the bread and water mixture into a large glass jar.
 

Then I added the active sourdough culture and mixed it well with the bread infusion. After that, I added a couple of tablespoons of molasses. It gives a beautiful color to kvass. Plus, it is excellent supplementary food for lactic acid bacteria.

Finally, I covered the jar with a plate and left it at room temperature overnight.
 
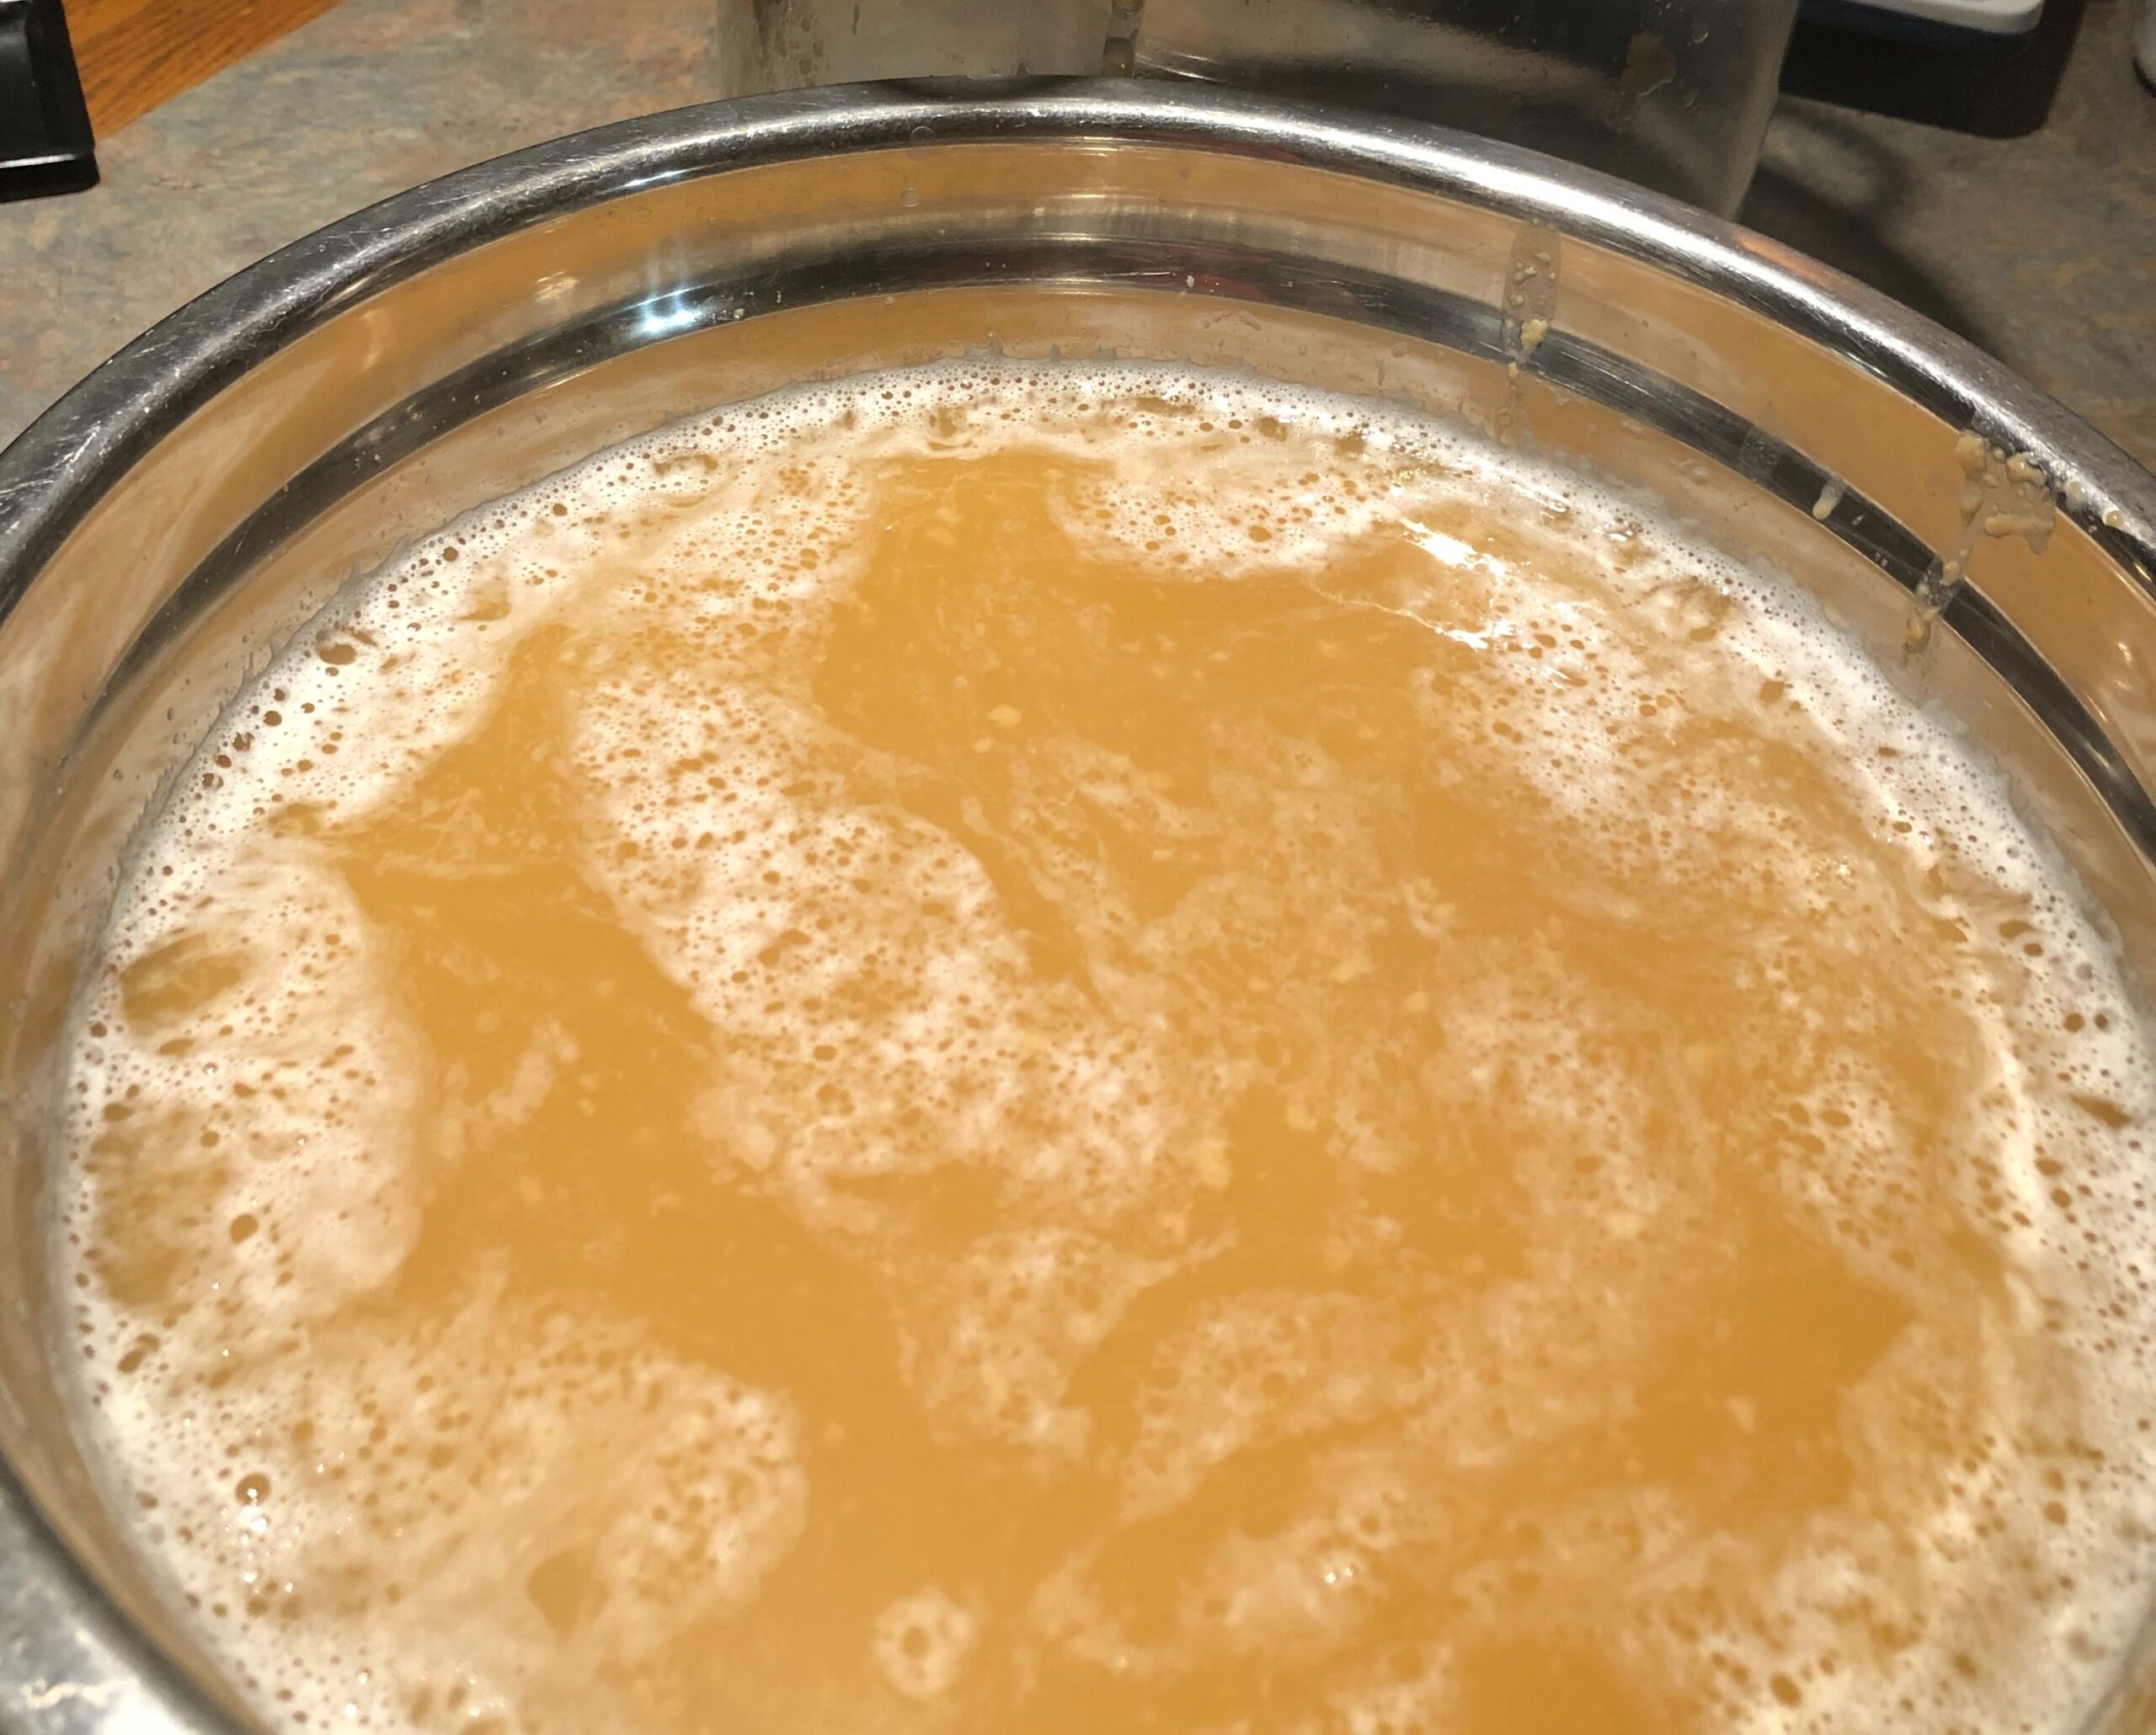
In the morning, it all looked like this…
 

The smell is fragrant and very bready. Not enough acidity yet. The first fermentation is not over.
 
The next photo shows my future kvass a few hours later.

By the evening, the kvass should be ready to get transferred to bottles.
 
Stay tuned for the next post.
Categories
Blini Sourdough discard

Sourdough Blini with Oat Milk

Blini is a yeasted or naturally leavened (sourdough) version of crepes. They are a great way to use your sourdough discard. Blini are not paper thin like crepes, but fluffy because of the fermentation. They are infinitely versatile. One can serve them with a great variety of toppings or fillings.


Sourdough Blini with Oat Milk

Blini is a delicious way to utilize your refrigerated or fresh sourdough discard to enrich your blini batter.
Prep Time 1 hour 40 minutes
Cook Time 30 minutes
Course Breakfast, Dessert
Cuisine Russian
Servings 4

Ingredients
  

  • 160 grams active sourdough
  • 600 grams oat milk
  • 16 grams monkfruit sweetener or sugar
  • 91 grams eggs, 2 large
  • 225 grams all-purpose flour
  • 1 pinch of salt

Instructions
 

Making the batter:

  • Combine the sourdough with oat milk. Add monk fruit sweetener or sugar. Whisk everything vigourously. Add eggs and salt. Whisk everything together again. Many people use room-temperature eggs because they mix better.
  • Add flour and whisk everything again. Mixing is finished.
  • You could also use a blender. It takes about 30 seconds to blend your batter until smooth.
  • In the ideal world, you let your batter ferment for about an hour and a half or two hours. If you want to make your blini faster, you may let the batter rest for 30 minutes. Then you add 1/2 teaspoon of baking soda with a splash of vinegar. It will mimic the fermentation process and will give you those tiny air bubbles in the batter that you strive to get.

Cooking:

  • Heat your non-stick or well-seasoned cast-iron crepe pan over medium heat for 2 minutes. I always season my pan with melted Ghee, organic coconut oil, or light olive oil. I do it every time before pouring the batter onto the crepe-pan.
  • I use a 9-inch crepe-pan. To pour the batter onto the pan I use my old 1/2-cup ladle, which is a perfect match for the 9-inch pan of the pan. I put one full ladle of batter onto the pan and start tilting and swirling the pan to distribute the batter evenly.
  • I cook blini until the edges start lifting from the pan and the color is golden or golden-brown. The color largely depends on the amount of sugar and type of flour used in your batter. It usually takes 1-1.5 minutes.
  • Then I lift the edges of the blini with a silicon-coated, heat-resistant spatula, and flip them over. I cook blini on the other side just until they reach a golden color. It usually takes about 40-45 seconds.
  • Slide your blini onto a plate.
  • I always brush the top side of my blini with melted Ghee or butter while they are still hot. That way blini stay soft longer and do not stick to each other. Butter coating also makes it easier to reheat blini if you plan to store them in the refrigerator.
  • Stack blini on top of one another and let them cool down completely before refrigerating or freezing. You can keep them in the refrigerator for up to 5 days. I put blini in a glass container with an airtight plastic lid. I do not freeze them, but you may freeze the blini for up to one month.

Notes

  1. For a lighter batter, use freshly sifted flour.
  2. For a savory version of your blini, you may omit the sugar and add some grated Parmesan cheese. Adding some herbs is another option.
  3. To season your crepe-pan, you may use a heat-resistant silicone pastry brush or a paper towel. Each time you need to add only a thin layer of oil to the pan.
 
Keyword Naturally Sweetened, Vegetarian

Enjoy your meal!

Categories
Kimchi

Kimchi

Kimchi is one of the traditional and most popular side dishes in Korean cuisine. It combines salted and fermented vegetables with a variety of traditional seasonings.
 
The most well-known variety of kimchi outside Korea is Napa cabbage kimchi. It is available in many large supermarkets. Koreans make a variety of soups with it and also use it as a wonderful companion to rice.
 
For me, kimchi is a must-have salad for rice, especially in the cold season. It is rich in vitamins and minerals. It also contains Lacto bacterial cultures beneficial for your immune and digestive systems.
 
You can eat it immediately after preparation as a fresh salad. Or, you can let it ferment for a few days before you put it in the refrigerator to slow down the fermentation process.

We had a Korean neighbor in our old neighborhood. She showed us how to make kimchi. I would not call it a recipe, but a technology. Though the technology itself is rather simple, it is very important to have the right ingredients.


Ingredients:


  • Napa cabbage – 1 large head (or 2 small heads)
  • Coarse salt
  • Carrots
  • Garlic
  • Ginger root
  • Scallions (spring onions)
  • Korean dried pepper flakes (NOT powder)

You can learn a lot about kimchi traditions from the Internet. You may find out, for instance, that in Korea it is not customary to put either carrots or scallions (spring onions) in kimchi.

But carrots and scallions enrich the color spectrum of the finished product. Plus, they add a lot of vitamins and minerals. Our neighbor has always used them.

I usually buy cabbage at the farmers’ market. You can also get it from your local Asian store or a regular supermarket.


I cut my Napa cabbage lengthwise into four parts and sprinkle with coarse salt all the leaves of the cabbage (inside and outside).


Next, I place the cabbage in a container and put a smaller container or a tray on top. I put some weight onto the smaller container to help the salt do its job. I use glass baking trays as containers and discs from dumbbells as weight. Improvise!

There is another way to let the salt work with your Napa cabbage. You can make a salt bath for your cabbage. For that, you dilute some salt in water. Make sure the water is saltier than you would like your Kimchi to be. All your quartered cabbage should be underwater.


Either way, this Napa and salt interaction should last from 8 to 12 hours. I usually do it overnight.


After that, you need to wash off the extra salt from the batch with weights and squeeze all the extra liquid from them.


If you choose the salt bath, you will need to rinse them with clean water and also squeeze all the extra liquid.


Now I add the rest of the ingredients. I use a spiralizer (spiral vegetable cutter) to cut carrots. If you don’t have a spiralizer at hand, cut the carrots into thin long strips with a knife.


I cut scallions into long pieces. The photo shows how it looks.

I sprinkle every leaf of my cabbage with Korean pepper. I also rub them with a paste made of mashed garlic and fresh ginger root.


I use this specific pepper. Powdered pepper won’t give you the results you want.

I put everything in the glass jar in layers. Do not close the lid tightly. Let your Kimchi stand at room temperature for 1-3 days.


Koreans prefer well-fermented (sour) kimchi. They do not refrigerate it after the first few days of fermentation.

 Ferment it to your liking. You are the chef in your own kitchen.

Healthy fermenting!


Categories
Pizza

Artisan Pizza. Part 2 – Pizza Margherita

This post is about the well-known “Pizza Margherita”. In  1889 the Neapolitan pizzaiolo Raffaele Esposito created this pizza to honor the wife of the King of Naples Margherita. This famous pizza reflects the colors of the Italian flag.
 
Your dough is ready, and you can make pizza. What follows is my working algorithm. Feel free to make your own.
 
 
Preparing the oven
 
I lay out the tiles on the oven rack. The photo shows at what height I place the oven rack with the tiles on it. I preheat the oven to 550 ° F (287° C). With tiles, the oven warms up longer. You will have enough time to prepare everything.
 
 
Stretching the dough
 
I lay out the silicone mat on the kitchen counter. It will be my work surface. I put some olive oil on my work surface to make it easier to work with the dough.
 
If the dough is straight from the refrigerator, stretch it with your fingers in several steps. Give your dough some time to relax between your stretching rounds. Each time you stretch the dough to the point when the dough starts to “resist” stretching. You need to stop and let the dough rest for a few minutes.
 
After resting, you can stretch again until the point when your dough resists your manipulations. This way, you will stretch the dough to the desired thickness. Try not to make the dough too thin.
 
First, I transfer the stretched dough to parchment paper. It is very easy to do. I put a piece of parchment paper on top of the dough and adjust the shape by stretching the edges of the dough over the parchment.
 
Then, I turn the silicone mat upside down. The parchment is on the kitchen counter, and I remove the silicone mat from the dough. This is why I greased the mat with olive oil.
 
 
Toppings for the pizza
 
Next, I take 4 rounded tablespoons of my pizza sauce and carefully spread it over the edges of my future pizza. Then, with the back of this spoon, I spread the sauce over the entire surface of my pizza.
 
After that, I add my favorite seasonings and some caraway seeds. This is optional. Use your own seasonings or just your favorite pizza sauce.
 
I play it simple with cheese. I tried many different kinds of cheese, but most of all I like pizza with traditional mozzarella cheese. It is very convenient to use small balls of mozzarella cheese, but I use cheese logs as well.
 
 
Baking 
 
 
I use a sheet of plywood to drop the pizza onto the tiles. I also have a special wooden pizza board with a handle, but it is smaller than my today’s pizza. A sheet of plywood does an excellent job.
 
It takes about 7-8 minutes to bake this pizza. Watch it closely after the first 7 minutes. At this temperature, everything happens quickly. 
 
My pizza is out of the oven and I garnish it with basil leaves. Many people like putting basil on pizza before baking. It is a matter of preference. I prefer fresh basil.
 
You can also use other leafy greens to top your pizza. I use spinach, spring mix, and arugula as well.
 
Here is my photo guide:

Enjoy your Pizza Margherita!

Categories
Pizza

Artisan Pizza. Part 1 – Making the dough

Today, I want to share my favorite recipe for homemade pizza dough. This dough is a real gem for a busy lifestyle. It is a healthy version of a pizza dough because of a long fermentation with very little yeast. It gives you the flexibility to bake on your terms. This dough keeps well in the refrigerator for 2-3 days and only benefits from cold fermentation. Let it proof for an hour and a half at room temperature before putting the dough in the refrigerator. You can use the dough straight from the refrigerator; there is no need to warm it up.
 
 
Equipment:
 
1. Kitchen Scales. I also use measuring cups in my kitchen, but only for very simple cooking jobs. Every serious home baker should use a kitchen scale.
 
2. A pizza-stone, or some ordinary non-glazed ceramic tiles from a hardware store. This is what I have been using for many years.
 
3. An oven capable of operating at 550 ° F (287 ° C) is essential. At a lower temperature, it will be a completely different pizza. You can experiment for yourself and see the difference.
 
4. A stand mixer, KitchenAid type, or similar.
 
5. Bread flour (or regular all-purpose flour). Flour should be unbleached. If you use all-purpose flour, then you might need to reduce the amount of water in the dough (by about 25-50 g).
 
6. Spring or filtered water (room temperature).
 
7. I use Active Dry yeast, but you can work with Instant Yeast as well. I like to work with sourdough, yeasted pre-ferments or use cold fermentation for all my bread.
 
8. I use sea salt.
 
9. Silicone mat as your work surface.
 
10. A little vegetable oil to lubricate the container for the dough and your work surface. I will show you how to use it. My oil of choice is extra virgin olive oil, but you can use any vegetable oil you like.
 
 
Ingredients:
 
  • 660 g water
  • 1000 g flour
  • 1/4 teaspoon of instant yeast or 1/4 heaping teaspoon of dry active yeast.
    20 g salt
 
I measure all ingredients in separate containers. Pour water into the mixer bowl. Sprinkle yeast on top. If you use Active Dry yeast, follow the directions on the package on how to activate the yeast. Usually, you use lukewarm water and let the yeast rehydrate for 5-10 minutes. Instant yeast is ready for mixing with no activation.
 
Add about half of the flour and start mixing at low speed. Gradually add the rest of the flour. This way, you do not overload your mixer and avoid dusting your kitchen with flour.
 
Do not add salt at this point. Stop the mixer and give your dough rest for about 20 minutes. This will allow you to shorten the mixing time and get a better dough.
 
After 20-minute rest, start mixing again, gradually adding salt. Then, switch to a medium speed of the mixer and mix the dough for about 5 minutes.
 
Some mixers dislike working with stiff dough and start “jumping” on the table a little. You hold the mixer in place with your hand. My old KitchenAid did not do that, but the new one is fidgety. Do not leave your mixer unsupervised.
 
After mixing:
 
Give your dough another 20-minute rest. Then shape the dough into a ball and put it into an oiled container for proofing. If you want to make several pizzas, divide the dough into several pieces and shape each piece into a ball.
 
I usually make this dough around 10-11 am on Saturday for the evening dinner. I finished the batch at 10:32 am, as you can see in the photo. The dough fermented at room temperature until evening.
 
Refrigerating the dough:
 
Let your dough proof at room temperature for about an hour and a half before putting it in the refrigerator.
 
I divide the dough into three parts and keep two parts in the refrigerator. The dough is very versatile and you can use it for many things, not only pizza.

Stay tuned for more information about pizza.

Categories
Rye Bread Sourdough Bread step-by-step recipe

50% Rye Sourdough Bread with Caraway Seeds50


Every homemade bread starts with inspiration. I liked the idea of the popular Jewish Rye bread, which combines white and rye flour with caraway seeds. Traditional Jewish Rye bread has about 30% of rye flour. My bread has higher rye content, and it is sourdough bread. 


Ingredients


  • White sourdough — 200 grams
  • Water, room temperature – 750 grams
  • Bread flour (or all-purpose flour), unbleached – 500 grams
  • White rye flour – 500 grams
  • Salt (sea salt) – 20 grams
  • Caraway seeds – 30 grams

The night before, I refreshed my sourdough, as I described in my post about my new sourdough:


“If, like me, you like sourdough bread that is not too sour, then your sourdough feeding schedule will roughly be 1: 3. That is 1 part sourdough to 1.5 parts flour and 1.5 parts water. The acidity of the starter will be about 4.2-4.5 pH. The leaven can increase in volume by three or more times. This largely depends on the individual qualities of your flour and the sourdough itself. Gradually, you will develop your own schedule for feeding and working with your starter culture.


If I need 200 grams sourdough in the morning, then I take 60 grams sourdough from the refrigerator and refresh it with 90 grams of water and 90 grams of flour in the evening before mixing your dough. That way I will have 200 grams of active sourdough in the morning and extra sourdough to keep in the refrigerator for future use. This is what ratio 1:3 means for sourdough feeding.


I would feed this extra sourdough with 1 teaspoon of water and 1 teaspoon of flour and put it into the refrigerator until my next baking session. I bake 2-3 times a week. My sourdough does not get too inactive.


If you do not bake that often, start refreshing your sourdough a day or two before mixing the dough by refreshing it every 12 hours using the same 1:3 ratio. If your sourdough is very dormant, you can use 1 part sourdough, 1 part water, and 1 part flour to start up the refreshing schedule. For the next feeding, you will get to a 1:3 ratio (1 part sourdough for 1.5 parts water and 1.5 parts flour).


This is what I got the next morning.


Mixing the dough


  1. Pour 750 grams of water into a mixing bowl of your stand mixer. Add all your bread or all-purpose flour and start mixing at a low speed. 
  2. When all the white flour is incorporated, gradually start adding white rye flour.
  3. When all flour is mixed with water, stop mixing, cover your dough with a clean kitchen towel to prevent it from drying, and let it rest for about 20 minutes. 
  4. Add salt and mix the dough at low speed for 5 minutes. During the last 2 minutes of mixing, gradually add caraway seeds.
  5.  Let your dough rest for another 20 minutes.

At this point, the dough is ready for the structure strengthening technique, which I call stretching and folding in the mixing bowl. You can see how runny and sticky the dough looks before I proceeded with this technique.


Stretching and Folding


I have explained how to perform this technique in the post about my basic sourdough bread.

The dough after the first round of stretching and folding

After every round, my dough gets stronger. It means that gluten molecules build stronger bonds. Many bakers rely on the so-called windowpane test, to determine how well gluten has developed.


Usually, a baker cuts a small piece of dough and gently stretches it to see if the dough can be stretched to a paper-thin, translucent membrane. Bakers do it with both hands on the dough.


I wanted to take a picture of the translucent membrane, so I had to stretch my dough with one hand and hold my phone with another. Here is what I managed to do. 

I gave my dough another 20-minute rest. Then I performed the 3rd round of stretching and folding, followed by another 20-minute rest. Now, the dough is ready for dividing and shaping.


Dividing and Shaping


I described how to shape the bread in the post about my basic sourdough bread.

After shaping, the bread goes to the refrigerator for the long final fermentation. I keep bread in the refrigerator from 12 to  48 hours (rarely 72 hours). This is how I do it.

Baking in a Dutch Oven


On my baking day, I take my large cast-iron Dutch oven and pre-heat it in the oven with a closed lid to 250 C (485 F).


Meanwhile, I take the bread out of the refrigerator and gently place it on parchment paper a little larger than my bread in width, but with long enough ends so I can put the bread into the Dutch oven holding the ends of the parchment paper without burning myself.


I take the Dutch oven out of the oven and put it on a heatproof stand. I also have a stand for the Dutch oven lid nearby.


Now, I make cuts in the bread with a sharp razor on a wooden kebab skewer. You may use a special lame for bread.


After that, I open the Dutch oven and put the bread on parchment directly into the heated Dutch oven.


After that, I cover it with the lid as quickly as possible and put it back in the oven for 27 minutes.


After 27 minutes, I remove the lid from the Dutch oven and turn the temperature down to 230 C (450 F).


I bake the bread for another 5-7 minutes. Then, I take the Dutch oven with the bread out of the oven, put the bread on a baking sheet, and return it back to the oven for another 5-7 minutes to finish baking.


After 5-7 minutes, I turn the oven off, briefly open the oven door to let some hot air and leftover steam out, and leave the bread in the oven for another 5 minutes.


For some bread, it is a requirement in order to avoid a sharp change in temperature, which might cause the crust to crack.


Another 20 minutes of cooling time on the wire rack and the bread is ready to be enjoyed.


20 minutes is the absolute minimum that the French bakers regard as a law for selling fresh bread. Of course, it is better to let the bread cool completely if time permits and your family members are patient enough.


It is a relatively simple and amazing method of making delicious and healthy homemade sourdough bread. 


Baking on Ceramic Tiles


You can also bake this bread directly on a baking stone or ceramic tiles.


You should place a couple of half-sheet aluminum pans on the lower rack of the oven (one inside the other) in order to use ice cubes to create steam during the first 10 minutes of baking.


I usually slide the bread onto the ceramic tiles and immediately put 5-6 ice cubes into the preheated aluminum pans.


I lower the temperature of the oven to 218 C (425 F) after the first 15 minutes of baking and bake for another 20 minutes.


If the bread looks ready at that point, I turn the oven off, briefly oven the oven door to let leftover steam escape, and leave the bread in the oven for another 5 minutes to finish hardening the crust.

Happy creative baking to you!


Solverwp- WordPress Theme and Plugin